Installing Hydroboost in my Trans Am was rather straight forward once I knew what was involved. Though it took some time to acquire the parts necessary for the swap, I found it was worth the effort ten fold. The amount of brake pressure and confidence hydroboost gives an old car is indescribable.
For those who are curious to see an installation of Hydroboost on video, check out the TV Show Wheeler Dealers episode 162 where Ant installs a Hydroboost unit into a 1971 Chevrolet C-10 Truck.
To get started, you need to assemble the parts necessary to make the swap, select your hydroboost unit, prepare it if necessary, then install. Installing can be tricky based on your situation. In my case, I needed to replace the master cylinder which lead to replacing brake lines and the proportioning valve. I also wound up replacing the power steering pump and hoses. When all said and done the changes were a good thing but required sourcing additional parts during the process.
Parts and Tools Necessary for Hydroboost swap
A Hydroboost swap requires the following parts:
- Hydroboost unit (Bosch 02040A2121 for 1997-2002 Astro Van for a 2nd Gen Firebird) Other units may be more appropriate for your vehicle, please read this entire post before purchasing parts.
- Master Cylinder compatible with Hydroboost unit (if yours is not compatible). 1982 Corvette Master cylinder (Dorman M39052 or Cardone 13-1749) for 4 wheel disc brakes works well if you have disc brakes all around.
- Wilwood 4 wheel disc adjustable Proportioning valve (if your current prop valve is not ideal for your setup or you take my advice and get an adjustable prop valve so you can dial in your brake pressure front and rear)
If you buy a hydroboost unit that is not designed for your vehicle you may need the following additional parts and tools:
- Mounting plate appropriate for your vehicle (ebay is your friend)
- Brake clevis / heim joint or other 3/8-24 threaded method to connect hydroboost to your brake pedal arm
- 3/8-24 thread Irwin hex die
- 1-7/8″ Crowfoot Wrench (Sunex 97750) for removing Hydroboost nut from back of bracket.
- Power steering pump for Hydroboost
- Type 1 pump (found on pre-1990’s vehicles, typical v belt pump): Borgeson 800323 Hydroboost 2 return line power steering pump
- Type 2 pump Saginaw TC series (found on modern vesicles, LS engines, serpentine belt drive systems): Lots of companies make a Type 2 pump most have a remote reservoir. Your reservoir would need to allow for 2 lines.
- Custom made power steering hydraulic hoses (6AN lines or custom made with SUR&R PS repair hose)
Acquiring a Hydroboost unit
There are 4 ways you can acquire a hydrboost unit:
1. New with mounting plate for your vehicle
This is the most expensive route but may save you the most time and hassle. There are retailers on the web including Hydratech Braking, Tallon (have to call them to order), and vendors on eBay that sell direct bolt-in units using for various model cars using new Bosch Hydroboost units with adjustable clevis/heim joint. Expect to pay $500+ depending on your vehicle.
2. New Bosch unit for a late model car you will need to modify
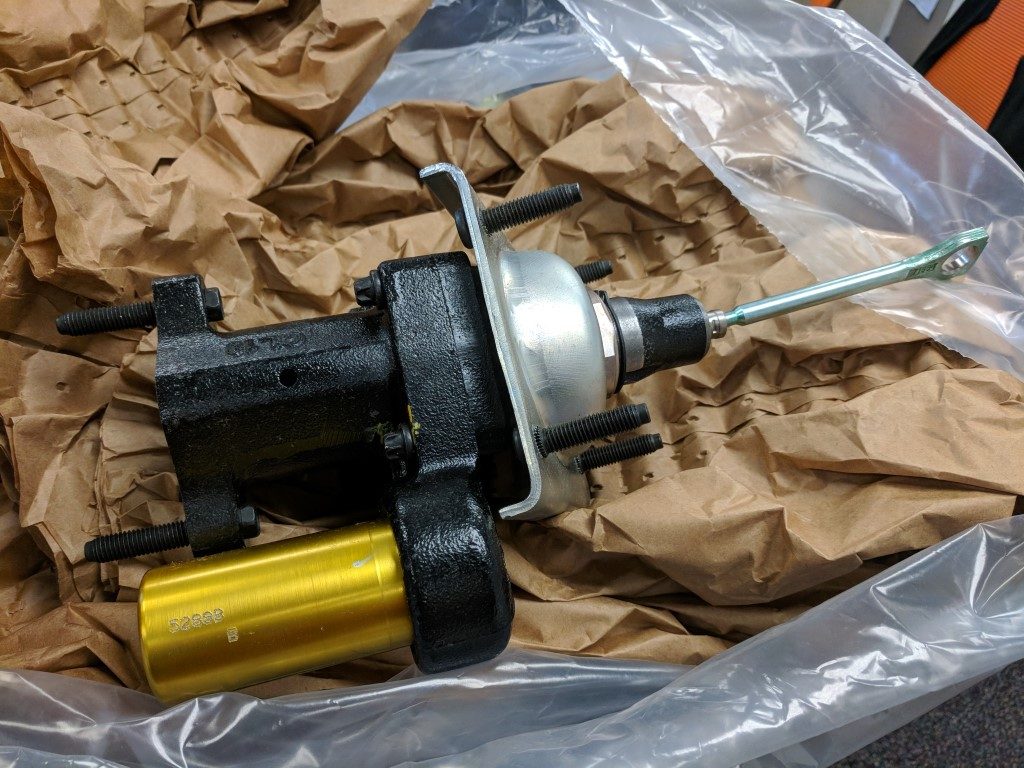
This is the route I took. I acquired a Bosch Hydroboost intended for a 97-02 Astro van. This required me to have to use a die to thread the push rod and also a special tool to remove the nut on the back to move the hydroboost to a special aluminum plate I purchased specific for my vehicle. Otherwise this was rather straight forward swap.
3. Acquire a used one from a donor vehicle
If you like junk yard diving or purchasing used parts online, you can acquire a used Hydroboost from the ideal donor vehicle. Same steps as option 2 apply, you will need to modify for your vehicle.
4. Purchase a re-man unit (WARNING)
This sounds like a good idea, and it is except for some reason, reman units seem to not include the rod that is mounted inside the hydroboost that pushes into the master cylinder. Be aware that if you do purchase a reman Hydroboost unit this part will most likely be missing and you will also have to acquire this push rod. If this is the case for you, google “Hydroboost Pushrod Kit” to find one for your application. Depending on the inner bore size you may need a small or large pushrod kit, which includes a spring and a 6 sided start shaped retainer that holds everything in place.
Preparing Hydroboost
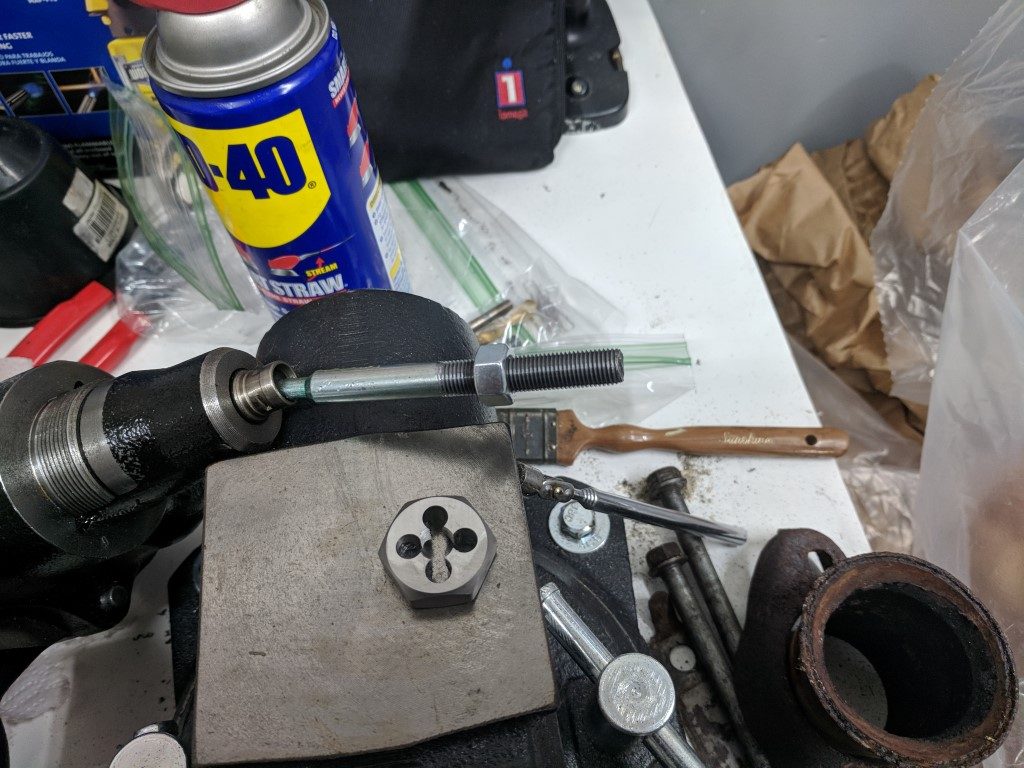
If you purchase a hydroboost unit intended for a modern car/truck, it will most likely require you to cut the end and thread it to adapt your own clevis to it. I purchased a quality die (tap and die set can also work) with 3/8-24 fine thread. The 3/8-24 fine thread is the most common used for such clevis joints when you go to an auto parts store or hot rod shop such as Jegs or Summit Racing.

Mounting Hydroboost
In some situations the existing mount plate on the Hydroboost may work for your application. For most of us, it will not work and you will need to remove the hydroboost and find a mount for your vehicle or buy a blank plate on Ebay and retro fit into your vehicle. In this case, you will need the 1-7/8″ wrench mentions above. The Sunex 97750 has been used successfully to remove the existing nut for the Hydroboost.
Depending on the mount plate you acquire you may need a special Hydroboost socket as pictured below. I first purchased one from eBay (furthest to the left) from someone who makes them from scratch. Avoid this version, it is not strong enough and you can visually see the 4 points spread apart if you use this tool. The middle photo is a GM Kent-Moore version, it is a very strong tool meant exactly for this purpose but is hard to find (don’t ask how I got one). The 3rd is what I got with the mounting plate I purchased from Tallon Hydraulics (no longer selling hydroboost units online, you must now call them). The Tallon one on the right is a one-time use only tool, unless you take it to get hardened according to their documentation. I opted to use the factory Kent-Moore tool. Depending on clearance though you may be able to use the mentioned crowfoot wrench.
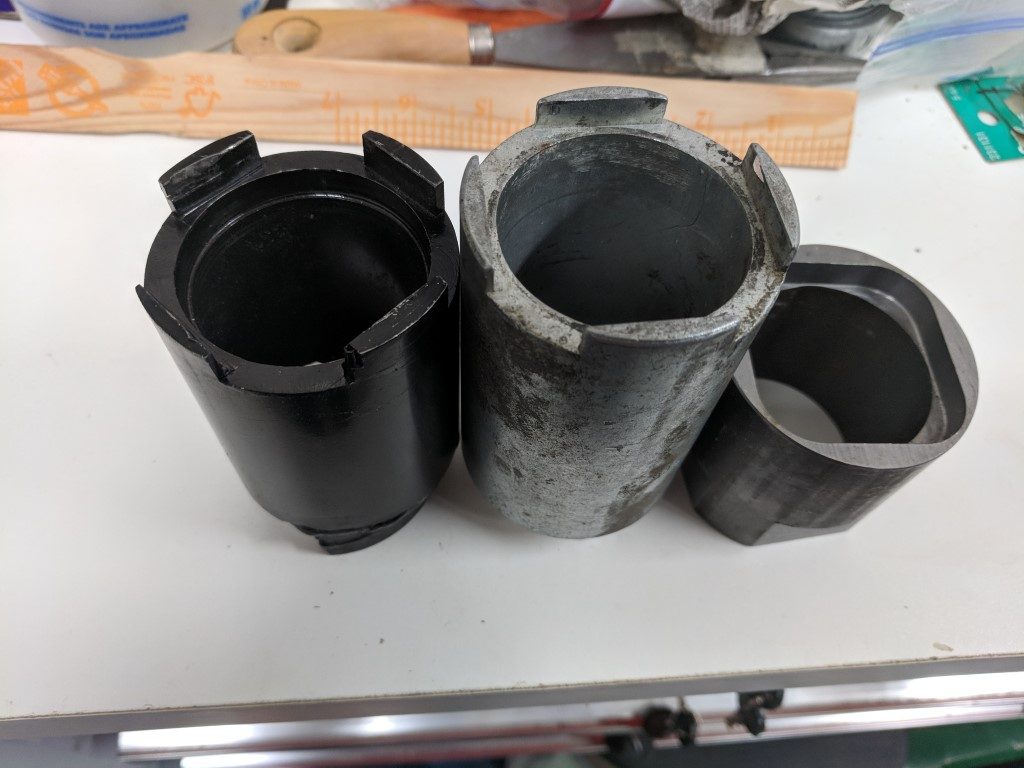
Since I did my swap last year, I have found a number of other vendors who now make Hydroboost sockets at an affordable price. A quick Google search I found a Hydroboost socket from Maximum Motorsports for $35, it has a good design and will not have the spreading issue as the one pictured on the left.
If you cannot find a mounting plate for your specific application, search eBay for “blank Hydroboost Mounting Plate”. Going this route gives you a couple of advantages: You will not need the special hydroboost socket to attach the hydroboost unit to it (you can use the crowfoot wrench which is much cheaper), and you will have complete control of the mounting position and angle. The only downfall with this option is you will need to do more fab creating brackets and measuring angles to find the optimal position and angle to mount the Hydroboost for your application.
Installing Hydroboost
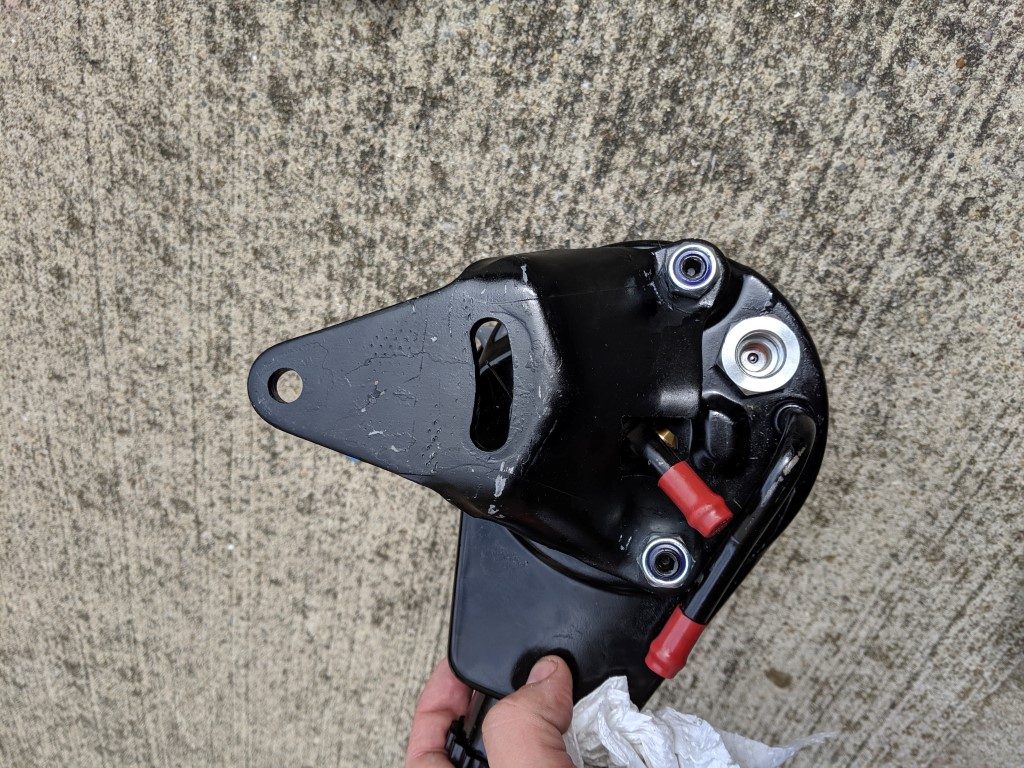
Installing the Hydroboost unit should be straight forward. I purchased a machined aluminum block designed to put the Hydroboost at the perfect angle mounted to a 2nd Gen Firebird/Camaro. It places it at an angle that puts the Hydroboost push rod centered between the upper power brake mounting hole and the lower manual brake mounting hole.
If I had one suggestion, I would recommend to Tallon to position the push-rod angle to center with the power booster mounting hole of the brake pedal. It is recommended not to put too much angle on the hydroboost push rod as it can cause uneven wear within the rear of the hydroboost. Though this angle is not dramatic in this situation, it could become an issue over time. More importantly, the brake ratio dramatically changes when mounted at the manual hole as it shortens the pedal travel ratio in relation to the distance the rod travels into the hydroboost. I created a new mounting hole on my brake pedal at the optimal angle for their hydroboost mount angle which was right between the upper power brake mounting hole and the lower manual brake mounting hole. What I found was the brake pedal travel was aggressive compared to factory. I now have it mounted at the upper brake booster mounting position and my brake travel is perfect. In other words, the factory brake pedal mounting position for a vacuum power brake booster is also optimal for a hydroboost power brake booster.
Master Cylinder, Brake Lines and Prop valve
I will not go into detail how to run brake lines, attach master cylinders and adjust prop valves. I will though mention some very useful resources that helped me.
82 Corvette Master Cylinder
A 77-82 Corvette Master cylinder will bolt right up to the 97-02 Astro van hydroboost unit. Brand new master cylinders from Dorman M39052 or Cardone 13-1749 can be found inexpensively at any parts stores as well as Amazon.com. Wilwood and other popular brake part brands also sell master cylinders that bolt right up without modification.
Wilwood Adjustable Proportioning Valve
The Wilwood 4 wheel disc adjustable Proportioning valve is an ideal replacement prop valve for 2 reasons: adjustable & uses 3/16″ brake lines at all ports.
There are various mounting brackets available for proportioning vales. I used a similar prop valve bracket found on Amazon which allowed me to mount the prop valve on the side of the master cylinder and put it at a slight angle to clear my inner wheel fender.
Note that this prop valve is intended for 4 wheel disc brakes. If you use rear drum brakes you may want to opt for a different prop valve that accounts for the pressure difference for drum vs disc brakes.
Easy to bend and flare copper-nickel brake lines
I decided to re-do my brake lines between the master and prop valve and between the prop valve to the front wheels and rear axle. To achieve this, I relied on Amazon and purchased the following parts and tools:
- 25 Ft. of 3/16″ (4.75 mm) Copper Nickel Brake Line with Fittings
- 16′ stainless steel brake line spring wrap armor coil guard
- Eastwood 3/16 flaring tool (identical to the Titan Tools 51535 3/16-Inch Double Flaring Tool)
The cooper nickel brake line is easy to bend and flare. The armor is perfect for where you run lines that may experience rock or other debris, it protects the brake line from getting damaged. I would never run brake lines without it under the car unless enclosed by body panels.
The Eastwood/Titan flaring tool made it very easy to flare 3/16″ lines perfectly every time. The copper nickel brake line is easy to handle and bend, practically by hand but you can also use a simple pipe bender like this one.
Power steering hydraulic changes
Hydroboost requires you to make pluming changes to your hydraulic power steering hoses in order to power the power brakes. Essentially the power steering pump first feeds pressure to the Hydroboost unit, which then “chains” a 2nd line from the Hydroboost to the high pressure entry port of your power steering box. Essentially Hydroboost simply taps into the existing pluming.
It is not quite that simple. Though the high pressure side is in series, the return low pressure is routed in parallel. Many posts in various hot rod forums and sites have conflicting advice on if you can merge the return lines into a T and continue to use your existing power steering pump. GM did do this on some vehicles, but in later years all hydroboost vehicles used power steering pumps that had 2 return inlet ports. I personally prefer to rest on the side of caution and go with a new power steering pump with 2 return inlet lines just to be safe.
Power Steering pump with 2 return inlet lines
I decided to run a power steering pump with 2 return lines. My first attempt was to run a re-manufactured power steering pump for the 1980’s Turbo Grand National. The Grand National came with a Hydroboost unit, though different older version than what I installed, should have had the same requirements for pressure. Unfortunately the reman unit I had was not up to the task of providing enough pressure to both my hydroboost and power steering. I ended up purchasing a new Borgeson 800323 pump.
For those who are not aware, there are 2 pump styles. The first was typically found in GM vehciles from the 60’s through the 90’s typically paired with v belts. Today they are referred to as “type 1” pumps. The other style is referred to as “type 2” and commonly used with serpentine belts. Type 2 pumps have a lot of flexibility and are typically setup with the reservoir remotely mounted in the engine bay. In this situation, the low pressure lines from the hydroboost and power steering box go to this remote reservoir. There are aftermarket remote reservoir with multiple return line ports available, but it may be easier to add a 2nd port to an existing reservoir by adding a 6AN bulkhead fitting.
Using 6AN hoses and fittings
My final setup I went with traditional 6AN fittings and lines. I will not cover how to make your own lines in this post, but i did make my lines to my desired lengths.
- Russell 6AN to 16mm x 1.5 O-Ring Seal 648060 (qty 2)
- Russell 6AN to 18mm x 1.5 O-Ring Seal 648080 (qty 2)
- Russell 6AN to 5/8″-18 640380 (for older power steering box)
- Russell 6AN to 1/2″-20 640330 (for older power steering pump)
- 6AN PTFE Lined Hose 6′
- 6AN PTFE hose end fitting straight (qty 0-4)
- 6AN PTFE hose end fitting 90 degree (qty 0-4)
- (optional) Unisteer 6AN to 16mm x 1.5 Banjo 8021560
I required the Unisteer Banjo fitting at the power steering pump due to clearance issues. Pontiac Power steering pump mounts in front of the Pontiac drivers side head which only provides about 2″ of clearance. Once the Borgeson 2 return line power steering pump was used, I could not easily use the factory bent hose as it collided with the return lines. The banjo fitting solved this issue.
Making custom hosts with SUR&R Power Steering repair hose
When I first did the swap, I made the hydraulic line that ran from the Hydroboost to the power steering pump with the SUR&R Power Steering repair hose. I took the factory hydraulic hard lines and cut them clean then used the SUR&R repair hose and attached them following the instructions to make new hoses to meet the length needs I had for my setup. I also tried to use this product for the hose from the Power Steering pump to the Hydroboost but had no luck finding starter tube that would clear my situation. When I ended with the banjo solution with the 6AN fitting, I decided to also re-do the other line to 6AN hose so everything matched. Though I do not use this product in my car at the moment, I had no issues with eh line i did make and I think it is a better “factory” looking approach to making custom power steering hoses for your hot rod.

Final results with Hydroboost brakes
The power of hydroboost brakes and the confidence it gives to a muscle car cannot be over stated. This may have been the single most signification upgrade to my Trans Am to date. If you have the patience, money, and desire to upgrade your brake booster to hydroboost, I strongly recommend it.