Project Trans Am has been on hold over the Winter while I work on the house. This March the weather broke enough to get back to it!
Ram Air Manifolds!
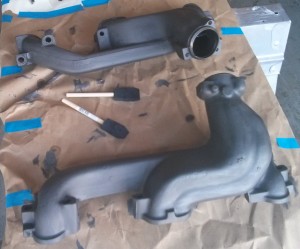
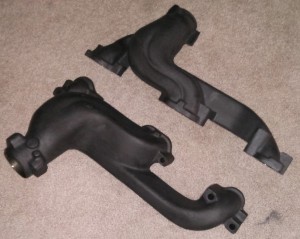
I purchased a set of exhaust Ram Air manifolds from Ram Air Restorations in February. I’ve had my eyes on these manifolds for a couple years, now that I’ve made additional changes to my engine setup I took the advice and got a pair of the over-sized 2-1/2″ exit D port Ram Air manifolds. They are beautiful pieces, lighter than the factory logs and they do minor porting work to match the ports to D port heads. I spent about $400 on them, $30 in Eastwood cast gray hi-temp paint and another $10 in new grade 8 bolts. The folks at Ram Air Restorations include detailed install instructions with a chart of the recommended bolt lengths and hardware.
The second photo is after my buddy Joel baked them over night in an industrial oven. This means the paint is fully cured and I don’t have to worry about them smoking when I fire up the motor in May.
Next month I will get new down pipes to match up with these manifolds.
Motor Status
As I said in the fall I took my motor to Don at DCI Motorsports, he reviewed my engine build and discovered the problem with my oil pressure. In a nutshell, if had I purchased a blueprinted oil pump from the beginning I would not have had issues. The plate at the bottom of the oil pump did not make a complete seal against the oil pump casting, allowing oil to bleed out at the plate. The pressure was fine when the oil was cold, but was off by about 10psi across the rpm spectrum when warm, so the gap must have been very small since cold oil was not able to bleed out. This more than likely happened either because the casting wasn’t completely true/flat from the factory and/or because I took the plate off to clean the inside of the oil pump and my re-assembly didn’t get the plate on correctly. Either reason, Don blueprinted my pump this time around, so I should be good to go. He did find a couple other problems such as I used the wrong length push rods for the valves I got and the viton 2 piece rear seal was leaking, most likely because the crank wasn’t intended for that type of seal.
Since he had the engine, I decided to have it converted to a roller. I will be running a hydraulic roller cam with solid roller lifters. Solid lifters are used primarily because the hydraulic lifters for Pontiac’s are not reliable. I also switched to Harland Sharp 1.5:1 true roller rockers (rather than roller tip rockers), and to match the setup better, I am swapping out the log exhaust manifolds with Ram Air manifolds pictured above. I’m also going to get a different torque converter to match the new engine setup.
UPDATE: When I picked up the motor Don explained that he was suspicious of the connecting rods I used as the source of the pressure problems and during re-assembly we swapped in my original cast connecting rods since they checked out ok. Don did replaced the factory rod bolts with ARP bolts. The pressure problem was less likely because of the the oil pump. Regardless, I am now running a blueprinted oil pump with an OEM W72 oil pressure spring, I am seeing 25 psi at hot idle now.
What’s Next
I’m going to be working on my front and rear bumpers next. I have a buddy who’s going to paint them black, all I have to do is fix any cracks then get them in his hands so he can do his magic. I’ll also be painting a few parts, working on the inside of the trunk and installing a remote trunk release. Factoring in Easter and my planned trip to Carlisle the following weekend, this should be plenty to keep me busy. Early may I will be re-installing the motor and tiding up the remainder of the car so I can get her on the road. But don’t, worry, I still have a ton of things to do, including wheels and tires, sub frame connectors and some wiring changes.

