So I’m now 18 months into my 1981 Pontiac Trans Am project and things are just now starting to come together. From April – July I really didn’t get to spend much time on the car, our new baby was coming (born June 27th) and preparing for/having him took precedence! I even had to neglect the lawn a couple weeks in July, luckily none of my neighbors complained.
Sand Blasting and Exhaust Manifolds – Blast Cabinet Blues
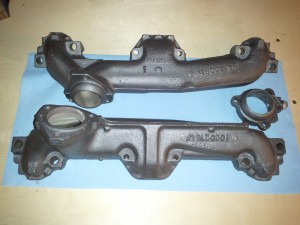
In August I worked on the small rusty parts for the motor. I sand blasted the exhaust manifolds before painting with Eastwood Exhaust Manifold Gray. I even purchased my own sand blasting cabinet similar to the ones sold by Summit/Jegs, but quickly discovered what a pain in the butt it is to own your own blasting cabinet. After 2 weekends using it, I decided I was better off going over to my buddy’s place rather than trying to turn my garage into a body shop. The blast cabinet I got was a table top model. Though it was technically big enough for my exhaust manifolds, it really was too small to work in, I had to open the cabinet every time I wanted to turn the manifolds to blast other sides. Perhaps if I ever had a larger garage I would get a bigger blast cabinet, but it’s just not practical for the garage I have now.
Once I got the manifolds painted, my buddy Joel baked them in his industrial oven. They came out exactly how they went in! I am pretty impressed with the Eastwood exhaust paint and will try some of their other paints in the coming months.
I also got all the other engine brackets and small parts to my core support blasted and painted.
Engine Painted and Freeze Plugs Installed – CAM PLUG ISSUES!
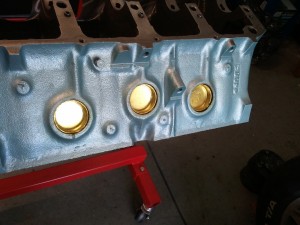
Painting the block and all the other parts was a labor of love. I now know why most engine builders recommend putting the engine together before painting, because it is a pain figuring out what should and should not be masked off! I figured it out though, and it sure looks good! I used Dupi-color engine paint DE1616 Pontiac Blue Metallic. The machine shop painted the heads already with this color, so I just had to paint the block, timing cover, oil filter housing, oil pan and water pump.
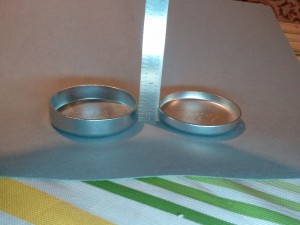
I then installed the freeze and oil gallery/galley plugs. Last was the rear cam plug. This is where things went bad. The Federal-Mogul freeze plug kit I got for my Pontiac 400 came with the wrong size freeze plug. Because I had to re-install the rear oil plug a second time, I purchased a 2nd Federal-Mogul freeze plug kit, and it also came with the wrong cam freeze plug. Luckily i was looking at the cam plug in the 301 block I had (luckily I didn’t get rid of it yet) and looked at photos of other freeze plug kits and discovered the problem was with the depth of the plug. I also discovered that NAPA Auto Parts sells individual freeze plugs! So the 3rd time around I got the exact cam plug size I needed and for less than $1.50 too!
The Pontiac references I have all say the plug needs to be .03″ deep from the “lip”. The cam plug packaged by Federal-Mogul is itself just over .04″ deep, so when installed, it went in too far. With the shallow cam plug with a depth of .02″, the plug installed correctly and the cam test-fit fit without hitting it.
I learned a few things with the cam plug issue. First is I’ll never buy a Federal-Mogul freeze plug kit for a motor ever again! NAPA rocks when you’re in a pinch. Third is te importance of test fitting all the parts. I wasn’t going to test fit the cam until I talked to my friend Tim who recommended test fitting everything and re-measuring all the tolerances of the bearings and plugs. Had I not test fitted the cam, I would have gotten much further into the build before discovering the problem, at which point would have made it a lot harder to remove and replace! Last important thing I learned is next time I’m going to buy everything from the Machine shop. I maybe saved $100 by buying everything from Summit/Jegs, but the headaches from some parts working and some not’ is not worth the savings.
Rings Filed, Rear Main Seal, Cam, Crank and Pistons Installed – ALL BUT 1 PISTON!
In September I somehow found time to file fit all my piston rings, install the rear main seal, crank, and cam! I spent one weekend just test fitting everything and using plasti-gauge to verify everything fit correctly. I actually discovered I was using the wrong main bearings in the wrong saddles during the process. Plasti-gauge is a tedious process, I never used the torque wrench so much before that weekend! IF your not familiar, you need to install the crank dry with all the bearings in and only test one bearing at a time. So if your tests go smoothly, you’re only doing this 5 total times. Unfortunately I did this 7 times because of the bearing miss-hap. After everything was said and done, all the bearings are at .002″. I also did this for all the connecting rod bearings, they are also at .002″. For the rod bearings I Was able to use a bore gauge. My bore gauge wasn’t big enough for the crank bores, so I had to use the plasti-gauge.
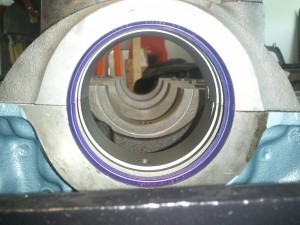
Rear main seal install went smoothly using a Viton rear seal. In the photo you can see it lines up perfectly, except one end came out a little bit. When the crank is installed, it presses in where it needs to be. I don’t see how this motor could leak, but time will tell!
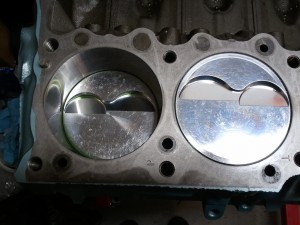
Before I installed the crank for the final time, I installed the cam. Its a lot easier to install a cam with the crank out. Once I got the cam and crank installed, I started installing the pistons. After getting the first 2 pistons installed as pictured, I discovered that I had 5 pistons tops of one valve relief design, and 3 the other valve relief design. This stopped me in my tracks, as I should have 4 and 4 of each type. I’m now waiting for the machine shop to get the new piston top in and swap the rods. I’ve since installed the remaining pistons, so all but piston 8 are installed, torqued and ready to go.
Firewall and HVAC
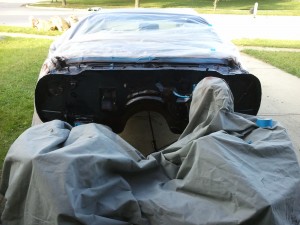
In October I Decided to repaint the firewall so it would have that fresh/new look under the hood. There wasn’t any rust to worry about, and only a couple spots where there was bare metal to worry about priming, but getting all the little parts off the firewall took a lot of time. Removing the wiper motor and assembly was a monster. Once I figured out how to remove these little clips underneath the wiper arms, things started to come apart smoothly. I also removed all the seam sealer from the top of the cowl as it was pretty dried out and cracked. The seam sealer on the sides did not look bad at all, so there must be something about seam sealer being exposed to water longer that may be why it was in worse shape. Either way, scrapping and cleaning that off was a bear. Once the cowl and the firewall were clean, I did my usual prep work (scuff with fine 3m pad and clean with paint thinner), taped off areas I didn’t want paint, and then went to work with fresh paint. I used Rustoleum Satin Black 7777. It’s not the best paint, but it’s not the worst either. Since this was going over existing paint, I wasn’t as worried about it getting damaged by drops of brake fluid someday. The firewall turned out quite nice.
I’m also in the process of rebuilding the HVAC box. Confusing at first, Ive pretty much figured out how the entire AC/Heat system works! it’s quite interesting how much of the duct work baffles and doors require engine vacuum in order to open/close. I’m also surprised someone hasn’t figured out how to replace all this stuff with modern actuators/valves tat run on electric motors. Either way, I’m almost done rebuilding mine, just waiting on a new Actuator for switching from AC to heat (kind of important). I am installing an AC Delete panel on the firewall, but the AC option is still necessary if I want to use the vents to blow air.
Degreed Cam
My buddy Joel came over a couple weeks ago and helped me degree my Crower 60918 cam. If you’re familiar with Pontiac cams, this cam is very similar to the popular 068 cam, kind of in-between a 068 H.O. cam and a Summit 2801 cam. With the timing chain straight up the cam is at 107 degrees, really close to the recommended 108 degrees. One thing I did learn though was the importance of a good cam degree kit. I got one of those universal Summit degree kits, which worked, but a motor specific kit made by Comp Camps would have made things so much easier. Next time I degree a cam, I’m getting the Pontiac engine specific Comp Camps degree kit, as it comes with a special crank socket that the degree wheel attaches to and has the specific dial indicator attachment for connecting to a Pontiac block.
Fan shroud
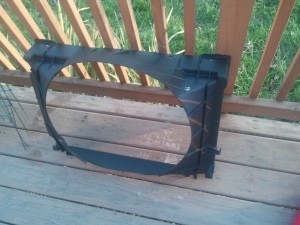
The fan shroud came with a very large crack, on the top of all places. I sourced another used one that would work in the short term when I decided to research if I could repair the current one. After doing some reading I found a post that explained why glue’s typically do not work, and the best thing to do is to melt the plastic back together with a soldering iron. So with my crappy soldering iron I did just that and it worked! The stitch (if you want to call it that) looks anything but desirable though, but it works. I was thinking about running filler of some sort over it, but after spending 30 minutes sanding the plastic I decided to leave it and call it a day. I then scuffed up the rest of the fan shroud, cleaned it then threw on some Krylon Fusion plastic flat black paint. I also painted some of the intake parts and the cowl vent at the same time. It came out pretty nice!
Special Thanks!
I have to give special thanks to my friends Joel and Tim for their help this summer! With all the little complications I’ve had, I’ve almost wanted to give up and hand the motor off to a mechanic to put together for me. Their confidence and expertise helped me keep going! Thanks guys!
I also have to thank my wife for letting me spend so much time in the garage. Thanks babe!
What’s Left
If I don’t run into anymore snags and the machine shop gets me the correct piston top in the next week, I should be able to get the rest of the motor assembled, front frame painted with Eastwood’s Chassis Black and get the motor installed in the car. Hopefully by December I’ll have the cam broken into and most of the car back together!
