The project progress has slowed in the second half of October, but I’ve still made a lot of progress with the interior and wiring.
New Windshield
I had the new windshield installed and man it looks good! Guardian Auto Glass of Columbus did a great job!
Interior
The first weekend I had the windshield out, I went ahead and painted the dash cowl area. I took my time and it came out awesome!


Wile the weather was still in the 70’s I decided to put some of the other to-do tasks on hold and focus on painting as much as I could. I went ahead and covered all of my interior parts with SEM Color Coat Landau Black topped with SEM Low Luster Clear. The process of prepping and painting the interior parts was easier than I originally planned, and I way over estimated on the amount of paint I needed as well. To paint everything, including the dashboard, all the interior panels, center console, metal portion of the dash, all metal trim parts, and t-top trim parts used5 cans of Landau Black and 2 cans of Low Luster Clear. I still have an almost full can of Low Luster Clear and Landau black if I need to do any touch ups. The extra cans I returned to Summit Racing, where I repurchased all the SEM supplies. The only things I did not paint were the steering column (already painted this past spring), carpet, seats, headliner and door panels.


Once the inside of the car is ready, I’ll be installing sound deadened, insulation, carpet and the interior. I’ll most likely install everything in phases, with the first phase including the dashboard and all the necessary gauges and steering column that way I can move forward in installing the drive train.
I also painted the wheel wells. They already had a coat of an epoxy primer from the shop I had them sand blasted at so I only needed to worry about top coating. I put 2 coats of satin black on the engine side to match my firewall and the wheel side I put a coat of Dupli-Color undercoating. They look good and are ready to go!

Wiring
I spent a good few hours going through under dash wiring to investigate where some of the cut wires went to. After following every single wire, I discovered that the cut wires all went to the rear window defrost wire harnesses. There are 3 harnesses that went to the rear defrost, 2 of which were hacked up by a previous owner. The car never came with rear defrost, it appears a previous owner decided they would use some of these wires for other uses. Why they didn’t mark them with tape and a marker is beyond me! But the good news is that I don’t need these wires so the plan is to simply shrink wrap the ends and then tape them up so they don’t short out on anything.
I also had to figure out the choke light wiring. For what ever reason the owner wired the choke light to other wires, most likely so the light would only light up when the car wasn’t running. Weird hack, I’m definitely going to restore this the way it is supposed to be wired since I plan on running an electric choke with the new motor.


I did not fix these wires pictured yet, but I will once the inside of the car is painted and ready for the interior.
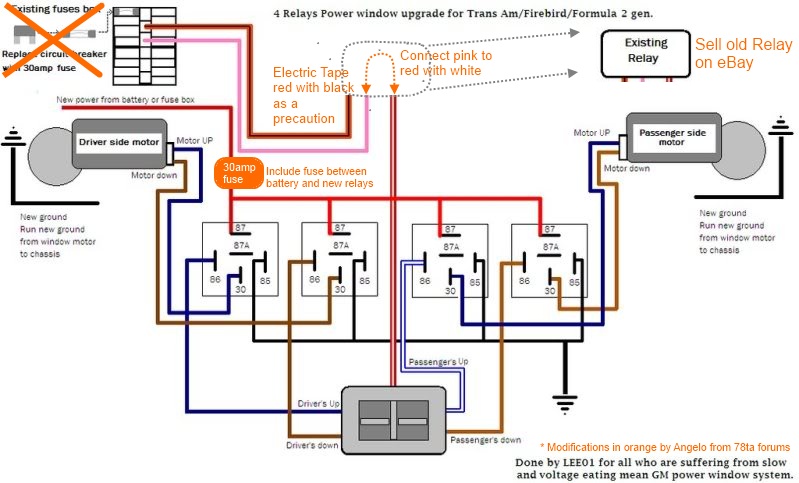
I did wire in the new power window wire harness with the 4 relay setup posted on 78ta.com forums. I didn’t test it in the car yet, I’ll get to test once I get the center console installed. I did test it with a volt meter and a battery, so I know all my soldering is solid. I did make a couple modifications to the original 4 wire relay design and posted my version on the 78ta.com forum thread.
Linkage and Steering Box
I got the shift linkage and steering box cleaned. It took a bit of time to get the steering box clean, it was really covered in a lot of grime. I decided not to paint it as it has a nice finish still on it. The linkage for the drive selector only needed a good cleaning, it looks brand new now. The steering column parking/neutral locking linkage has been cleaned and is ready to paint. As soon as the weather gets back to 60+ I’ll put a coat of paint on it and it’ll be ready.
Ordered Speakers
I did my final research on speakers and decided to get a pair of 6×9 Rockford Fostgate R1693 full range speakers for the rear and a pair of 3.5″ Polk Audio DB351 full range speakers for the front. I’m pairing these speakers to my old AIWA 52 Watt x 4 CD/mp3 receiver with aux input jack. For a 70’s muscle car, it should have a pretty good sound system. I also got a pair of DEA speaker baffles for the rear, they should help sound but more importantly protect the speakers in the trunk area.
What’s Next
Main focus now is the inside floors. I found some rust in spots on the floor boards, so I’m currently in the process of scraping all the protective asphalt stuff the factory painted on the floors to uncover any unknown rust. So far most of the rust is only surface rust, I hope that either Navel Jelly or a quick hit with a rust removing 3m disc will solve those spots. Once all the rust is removed, I’ll paint and then start installing the interior and remaining firewall items.
Since I can now see the end is near, I’m going to start finishing the assembly of the motor! Hopefully mid-December I will have a good weekend available to install the motor in the car and by Christmas start the motor!